One of the most common recommendations that I give to clients is to not use File Upload in Salesforce in the traditional way. What I mean by that is, cloud storage in Salesforce is quite expensive and as such I recommend all my clients to rather store the file on their web server/Google Drive and store the link of the file in Salesforce. This allows users to access the file whenever they want, they will anyways need to be on internet to access Salesforce.
Uploading Files from Salesforce to Google Drive
We did a unique solution for one of the clients. We created an Upload File button on the record page. On clicking the button user could upload a file from their system. The file would be saved on Google Drive in a company account and the link of the file would be saved in one of the fields.
The code for the apex controller is given below. The same solution can be easily applied on a related list. You can now upload multiple files per record, just like Salesforce native functionality. Note to upload file to Google Drive, you will need oAuth credentials from Google API. Follow this article to get API key from Google.

To create this functionality in your Salesforce org, follow the steps:
- Create a button “Upload File” on the record page from where your users want to upload the file.
- On click of the button, call your custom visualforce page.
- In the visualforce page, create file upload input using <apex:inputfile>
- On submit call the Upload method from your controller class.
The Visualforce page code is as below:
 <apex:page controller="GoogleDriveController" showQuickActionVfHeader="true">

<apex:slds />

<apex:form style="margin-top:5%;margin-left:5%;width:60%">
<apex:pageblock >

<br/>
<br/>
<br/>
<br/>
<apex:inputfile value="{!file}" contentType="{!filetype}" filename="{!filename}" />
<br/>
<br/>
<br/>
<br/>
<apex:commandButton styleClass="myClass" onclick="this.value = 'Uploading...'" value="Upload file" action="{!UploadFile}" />
<br/>
<br/>
<apex:messages styleClass="error" />
<br/>

</apex:pageblock>
</apex:form>
</apex:page>
Before we write the Apex code, we need to get the refresh token from Google API. If you have followed the steps to get oAuth credentials, you have the Client Secret, ID and the redirect URI for your project.
We now need the refresh token, which we will get here. Before this add https://developers.google.com/oauthplayground/ in authorized URI list in your oAuth2 credentials page (Console->Your project-> Credentials->OAuth 2.0 Client IDs->Edit). We will remove this later.
Now in the playground, add the client secret and client id to the configuration panel by clicking on the settings gear.
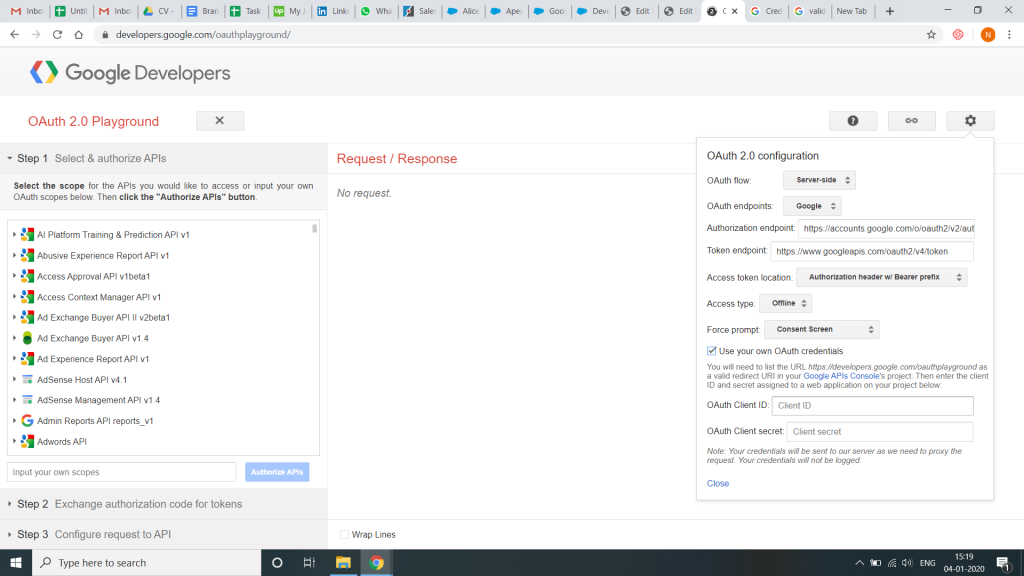
Choose Google Drive API from the right side API’s list and click Authorize API’s. Google will start authentication mechanism by asking you to allow playground to access your account.
Once the above is done, an authorization code will be returned. Click on Exchange authorization code for tokens to get the refresh token.
Copy the refresh token to clipboard and we are done with playground. You can now remove playground from your list of authorized URI’s.
Note: If you do not provide the oAuth2 credentials while generating the refresh token, the refresh token will be valid only for 24 hours.
Refresh tokens received after providing oAuth credentials are valid forever except for conditions mentioned here. If that does not suit your conditions, you can also send for authorization through the apex code.
Go to Salesforce setup and search for metadata. Open Custom metadata types and create a new meta data. Also create a custom text field in the meta data to store our refresh token.
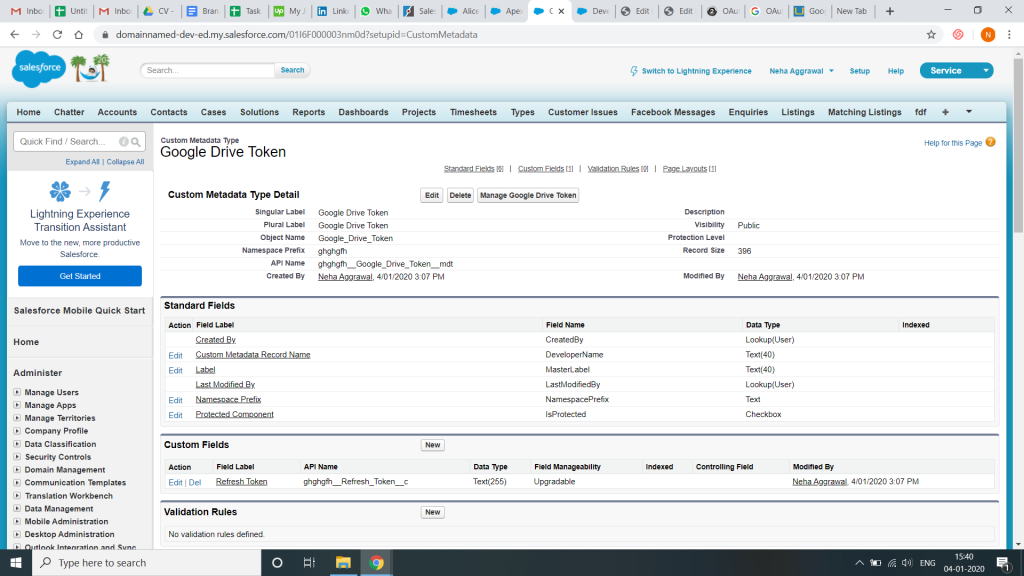
Now click on Manage button at the top and create a new record. Add the refresh token that you copied to clipboard and give a meaningful label and name to the record. Note down the name of the record and the API name of the Meta data type. It will be used in our apex code.
Whoof !! Finally, lets write our apex controller class now.
The Apex code for controller class is as below
I am uploading the file to Google Drive from Contact record page.
 public class GoogleDriveController {
private String code;

public boolean val {
    get;
    set;
    }

public blob file {
    get;
    set;
    }

public String filetype {
    get;
    set;
    }

public String filename {
    get;
    set;
    }

public Id ContactId=ApexPages.currentPage().getParameters().get('Id');
private string key = <Your client id>;
    private string secret =<Your client secret >;
private string redirect_uri =<Your Visual force Page URL>; // Should be //the same URL in authorized URL in your Google Developers Console //Project.
private String accesstoken;
private String refreshtoken;
private String thumbnailLink;
private String fid;
private String clink;
private Integer expiresIn;
private String tokentype;
 <Meta data Type API Name> gd= [Select Refresh_Token__c   from <Meta data Type API Name> where DeveloperName ='<Record name which has the refresh token>'];


public GoogleDriveController() {

 }

public PageReference UploadFile() {
 refreshtoken = gd.Refresh_Token__c;

try{
//Getting access token from google
HttpRequest req = new HttpRequest();
req.setMethod('POST');
req.setEndpoint('https://www.googleapis.com/oauth2/v4/token');
req.setHeader('content-type', 'application/x-www-form-urlencoded');
String messageBody = 'client_id=' + key + '&client_secret=' + secret + '&refresh_token='+refreshtoken+'&redirect_uri=' + redirect_uri + '&grant_type=refresh_token';
req.setHeader('Content-length', String.valueOf(messageBody.length()));
req.setBody(messageBody);
req.setTimeout(60 * 1000);
Http h = new Http();
String resp;
HttpResponse res = h.send(req);
resp = res.getBody();

JSONParser parser = JSON.createParser(resp);
while (parser.nextToken() != null) {
    if ((parser.getCurrentToken() == JSONToken.FIELD_NAME)) {
    String fieldName = parser.getText();
    parser.nextToken();
    if (fieldName == 'access_token') {
    accesstoken = parser.getText();
    } else if (fieldName == 'expires_in') {
     expiresIn = parser.getIntegerValue();
    } else if (fieldname == 'token_type') {
     tokentype = parser.getText();
    }

 } }
  } catch
(Exception e) {
    System.debug(LoggingLevel.ERROR,
'Call exception ' + e.getMessage());
  }


 System.debug(ContactId);
String boundary = '----------9889464542212';
String delimiter = '\r\n--' + boundary + '\r\n';
String close_delim = '\r\n--' + boundary + '--';
if(file!=null)
{
String bodyEncoded = EncodingUtil.base64Encode(file);
//Folder Id of Google drive Folder
String FolderId='1ob-7bEuyUZRxf47wgMJ_Kv2o4UrATRgt';
String body = delimiter + 'Content-Type: application/json\r\n\r\n' + '{ "title" : "' + filename + '",' + ' "mimeType" : "' + filetype + '",' + '"parents":[{"id":"'+ FolderId +'"}]}' + delimiter + 'Content-Type: ' + filetype + '\r\n' + 'Content-Transfer-Encoding: base64\r\n' + '\r\n' + bodyEncoded + close_delim;
try{
Http http = new Http();
HttpRequest req1 = new HttpRequest();
req1.setEndpoint('https://www.googleapis.com/upload/drive/v2/files?uploadType=multipart&withLink=true');
req1.setHeader('Authorization', 'Bearer ' + accesstoken);
req1.setHeader('Content-Type', 'multipart/mixed; boundary="' + boundary + '"');
req1.setHeader('Content-length', String.valueOf(body.length()));
req1.setBody(body);
req1.setMethod('POST');
req1.setTimeout(60 * 1000);
HttpResponse resp1 = http.send(req1);
System.debug(resp1.getBody());

Map<String, Object> p = (Map<String, Object>) JSON.deserializeUntyped(resp1.getBody());
thumbnailLink= (String) p.get('thumbnailLink');
fid=(String) p.get('id');
 System.debug(fid);
 clink='https://drive.google.com/uc?export=view&id='+fid;

//Changing file permission to public viewable using link
   } catch
(Exception e) {
    System.debug(LoggingLevel.ERROR,
'Call exception ' + e.getMessage());
  }
String body1 = '{"role":"reader","type":"anyone"}';
try{
http = new Http();
req1 = new HttpRequest();
req1.setEndpoint('https://www.googleapis.com/drive/v2/files/'+fid+'/permissions');
req1.setHeader('Authorization', 'Bearer ' + accesstoken);
req1.setHeader('Content-Type', 'application/json');
req1.setHeader('Content-length', String.valueOf(body1.length()));
req1.setBody(body1);
req1.setMethod('POST');
req1.setTimeout(60 * 1000);
resp1 = http.send(req1);
System.debug(resp1.getBody());
   } catch
(Exception e) {
    System.debug(LoggingLevel.ERROR,
'Call exception ' + e.getMessage());
  }
 if(ContactId!=null) {Contact c = [Select Id, Image_URL__c from Contact where Id =: ContactId];
  c.Image_URL__c =clink;
  update c;
  }

}
PageReference returnPage = new PageReference('/lightning/r/Contact/'+ContactId+'/view?0.source=alohaHeader');

return returnPage;
    }

}
First we send the API key and secret with redirect_url to get the access token. Next we send the file along with access token to Google Drive.
Folder Id of Google drive folder can be retrieved from the URL. Just create the folder in your google drive, open up the folder and check the URL. It will look something like this: https://drive.google.com/drive/u/1/folders/1mhwlrRfEFxK-NdzrF9oQkqjOPmfNLg6v
Folder Id is the text after “folder/” which is “1mhwlrRfEFxK-NdzrF9oQkqjOPmfNLg6v”.